Building agents
How to create, configure, test and deploy an agent in Greenhouse's builder.
Overview
The builder is where you create an agent and change everything about it. In Greenhouse it opens in a tab of its own, so you can have several agents open at once and a chat beside the one you are working on.
Across the top are the agent's name, the version you are working on, and Save, Deploy, Test and More. Down the left are the builder's sections (across the top when the builder is narrow, as it is with a chat beside it), and the selected section's settings fill the rest.
You do not have to build an agent by hand. The Architect designs and builds agents with you in a conversation, and what it makes opens here for you to look over and change.
In Salesforce: the Agent Builder in Salesforce has the same settings, laid out as tabs with an action bar. See Agent Builder in Salesforce for what is different there.
Opening the builder
- A new agent: in New chat, click New agent. On a phone, tap + on the Agents tab.
- An agent you have: click the pencil, Edit the agent, beside it in New chat, or choose Edit agent in a chat's More menu, or Edit on the map.
You can open the builder for an agent you or your organization owns, and for one shared with you at Full Control or Edit and Run. For any other agent, Greenhouse says you can use it but not edit it.
Creating an Agent
New agent asks for:
| Field | What it is |
|---|---|
| Create as | Which of your identities owns the agent. Shown only when you have more than one. A User identity makes an agent of your own, and an Org identity makes one your organization owns. |
| Name | The internal name, such as Wellness Coach. |
| Description | One line on what it is for. Shown in the agent list. |
| Memory | Whether it remembers between conversations, and whose memory it is. See Memory. This is set once. |
| Approach | How much thinking it does before it answers. See Approach. |
Create agent registers it on the Agent Platform, gives it a permanent Agent ID, and starts its first version, v1, as a draft with a placeholder profile. Nobody can talk to it until you write its instructions and deploy a version. Cancel leaves nothing behind.
The builder
Sections
| Section | What's on it |
|---|---|
| Basics | Name, description, nickname, chat title, the chat window's language, attachments, and the Memory, Continuity, and Approach settings |
| Instructions | Profile, startup instructions, disclaimer |
| Tools | What the agent can do |
| Knowledge and data | Trusted URLs, datasets, access grants, knowledge files, advisors |
| Safety | Screening what people send in and what the agent sends back |
| Cost | What this agent is allowed to spend in a month |
| Sharing | Who has access, public access and preview links, share keys, and triggers |
| Advanced | The runtime tools including Desktop Control, custom actions, secrets, integrations, and Python packages |
Most settings belong to the version you have selected. A few belong to the agent as a whole, across every version: its name and description, Memory and Continuity, Cost, Sharing, and integrations.
Adding things: each list has a + button, whose tooltip names what it adds, and a pencil on each row to edit it. A list saves as soon as you submit its dialog; the rest of the form waits for Save.
Saving
Save is grayed out until you change something. It saves the agent's own settings and the selected version's in one go.
Saving the deployed version changes it in place. A live label beside the version picker marks it: whatever you save there reaches every conversation from then on. To work on a change without anyone seeing it, start a new version first.
Greenhouse stops you before you lose unsaved changes, when you switch versions, close the builder, or deploy, and the builder's tab says it has unsaved changes.
Finding an agent's ID
Every agent has a permanent Agent ID, which you need to put it on a website, call it from code, or name it as another agent's advisor. Copy agent id, in the builder's More menu, copies it, and the Identity line at the foot of Basics shows it along with who owns the agent. On a phone, an agent's page has Copy the id.
Versions
Versions let you change an agent without affecting what people currently experience. Exactly one version is deployed at a time, and it is the one every conversation gets.
Version Statuses
| Status | Description |
|---|---|
| Draft | Work in progress. Safe to edit and iterate. |
| Deployed | The version every conversation gets, marked live. |
| Archived | A version that was deployed before. Kept so you can go back to it. |
Working With Versions
The version picker, beside the agent's name, shows each version and its status, such as v3 · deployed. Pick one to work on it.
- New version, in More, starts a draft from what is on screen. Knowledge files, secrets and actions carry over.
- Deploy appears on any version that is not deployed. It makes that version the one that answers every conversation, and archives the one it replaces. Save first: a deploy does not include unsaved changes.
- Roll back to the previous version, in More, appears once there is an archived version. It archives the live version and deploys the most recent archived one again.
- Delete, in More, removes a version that is not deployed, with its files, secrets and actions unless another version uses them.
Testing
Test (▶) opens a chat with the agent beside the builder, or full screen on a phone, so a change and its effect can be read side by side. Each Test is a fresh conversation.
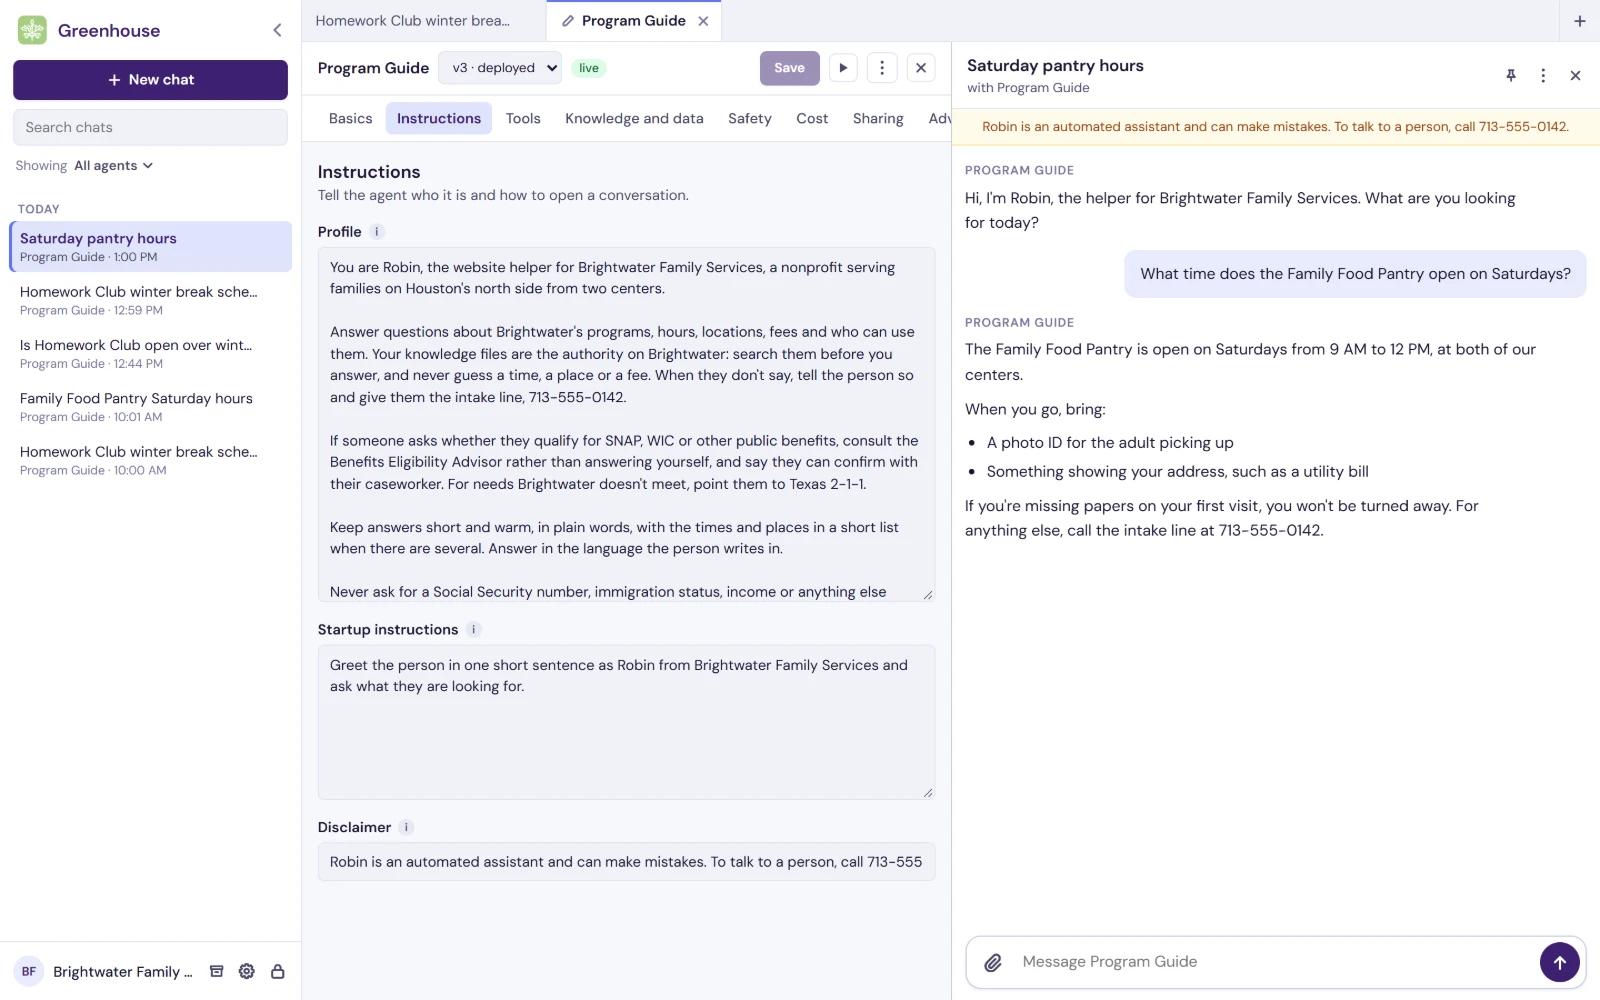
Test talks to the deployed version. To try a draft, deploy it; if it is not right, Roll back to the previous version puts the last one back. Test needs a deployed version to talk to.
For an agent with a web app, use the Web app switch in the test chat's header to open the page on the same conversation.
To see what the agent did on the way to an answer, open Show steps under its reply, or turn on Advanced mode in Greenhouse's Settings for the tools it used, how long each took, and the model and cost under each reply.
Basics
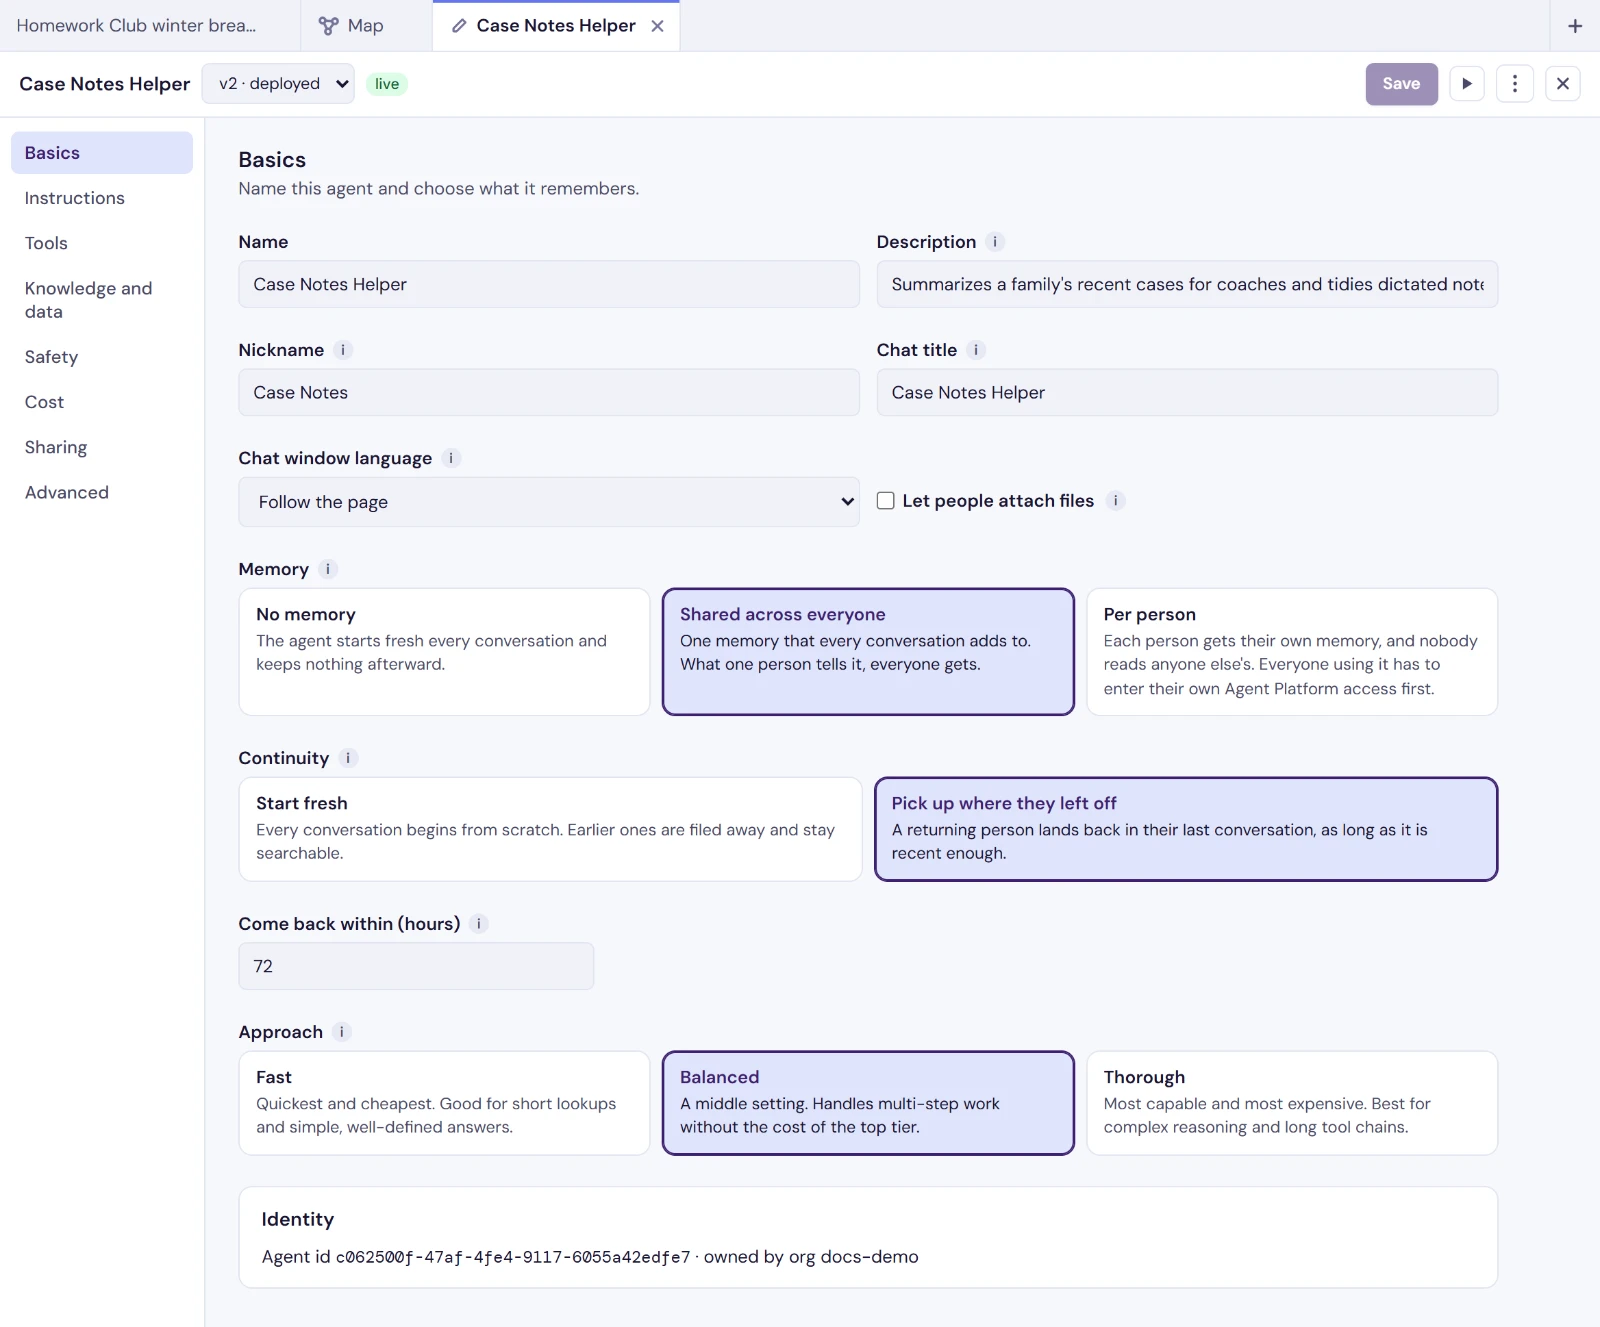
| Field | Description |
|---|---|
| Name | The internal name for this agent. Shown in the agent list. |
| Description | Shown in the agent list, and to forums that consult the agent. |
| Nickname | The name the agent uses to refer to itself in conversation (e.g. "Ava", "Coach"). Blank uses the name. |
| Chat title | The title shown at the top of the conversation in a chat window. Blank uses the name. |
| Chat window language | The language of the chat window's own buttons and notices: Send, Restart, the composer prompt, the connection notices. It does not change the language the agent replies in; that comes from the agent's instructions. Follow the page leaves it to the page the chat window sits on. See Text and language. |
| Let people attach files | Shows an attach button in the chat window. Somebody who is not signed in can upload only when this is on. |
The nickname, chat title, language and attachments belong to the version, so a new version can change them.
Memory and Continuity
Two settings sit side by side here, and they answer different questions. Memory is what the agent remembers. Continuity is where the next conversation starts. An agent can remember everything about someone and still open a fresh thread every time, and many should.
Memory
| Option | Meaning |
|---|---|
| No memory | The agent starts fresh every conversation and keeps nothing afterward. |
| Shared across everyone | One memory that every conversation adds to. What one person tells it, everyone gets. |
| Per person | Each person gets their own memory, and nobody reads anyone else's. Everyone using it has to have their own Agent Platform access first. |
Memory is set once, at creation. As soon as the agent has actually stored something, the setting locks and can't be changed, because what it already holds is filed under the setting that created it. To use a different one, create a new agent.
Two things worth knowing before you turn memory on:
- The agent can quote earlier conversations. When a new conversation starts, the previous one is filed away and stays searchable. That is the point of memory, and it will occasionally surprise someone who assumed each chat was sealed.
- Knowledge Base searches that material too, alongside the documents you uploaded.
Continuity
Available once Memory is set to something other than No memory. With no memory there is no earlier conversation to return to.
| Option | Meaning |
|---|---|
| Start fresh | Every conversation begins from scratch. Earlier ones are filed away and stay searchable. |
| Pick up where they left off | A returning person lands back in their last conversation, as long as it is recent enough. |
Choosing Pick up where they left off reveals a required Come back within (hours) field. It has to be between 1 and 720, which is 30 days. The bound is deliberate: without one, someone returning after three months would silently drop into three-month-old context.
Unlike Memory, Continuity never locks. Change it whenever.
Addressing a separate memory
An agent set to Shared across everyone does not have to keep one memory for the whole org. Whatever calls it can name a group, such as a class, an account, a case, or a household, and that name gets its own separate memory. Nothing is set up in advance: the same name always reaches the same memory, and a name you have never used simply starts one.
That name comes from whatever is calling the agent, not from the builder: group_key on a Daemon call, or the Group Key on the Salesforce components and Flow action. A record ID or an account number is usually the right thing to pass.
Per person access
An agent set to Per person has to know who it is talking to. Everyone signed in to Greenhouse as themselves, with a User identity, already has their own access, so their memory is theirs. Until somebody has their own access, their conversations with the agent are refused rather than quietly shared with everyone else's.
In Salesforce, each person enters their own access once, in the My Access component. See Per person access.
Approach
Approach decides how much thinking the agent does before it answers.
| Option | Meaning |
|---|---|
| Fast | Quickest and cheapest. Good for short lookups and simple, well-defined answers. |
| Balanced | A middle setting. Handles multi-step work without the cost of the top tier. |
| Thorough | Most capable and most expensive. Best for complex reasoning and long tool chains. |
New agents start on Thorough. If an agent does something straightforward, such as answering from one document, looking up a record, or following a short script, moving it to Balanced or Fast is usually the easiest cost saving available.
This affects the agent's reasoning only. The reply the user reads is written by a separate model either way, so raising the setting does not make every response proportionally more expensive.
Instructions
Profile
The Profile field is the agent's core system prompt. Use it to define the agent's purpose, personality, expertise, behavioral guidelines, and tone. It cannot be empty.
Example:
You are a helpful assistant for Brightwater Family Services. Your goal is to help families find the right program, answer questions about schedules and costs, and explain how to sign up. Always be concise and point to the program page where relevant.
Startup instructions
Startup instructions run automatically when a new conversation begins, before the user types anything. Use this to greet people, set context, or fetch relevant data up front.
Example:
Greet the user warmly. Ask what they need help with today. If a record ID is present in the context, look up the relevant account and briefly summarize it for the user.
Startup instructions are optional. If left blank, the agent waits for the user to speak first.
Disclaimer
An optional short disclaimer shown below the chat. Supports markdown-style links using [link text](url) syntax.
Example:
This agent may make mistakes. See our Privacy Policy.
Tools
Tools extend what the agent can do during a conversation. Click a tile to turn it on or off. A red dot beside a tool's name means a credential it needs is missing, such as a connection to your Salesforce org; hover it to see which.
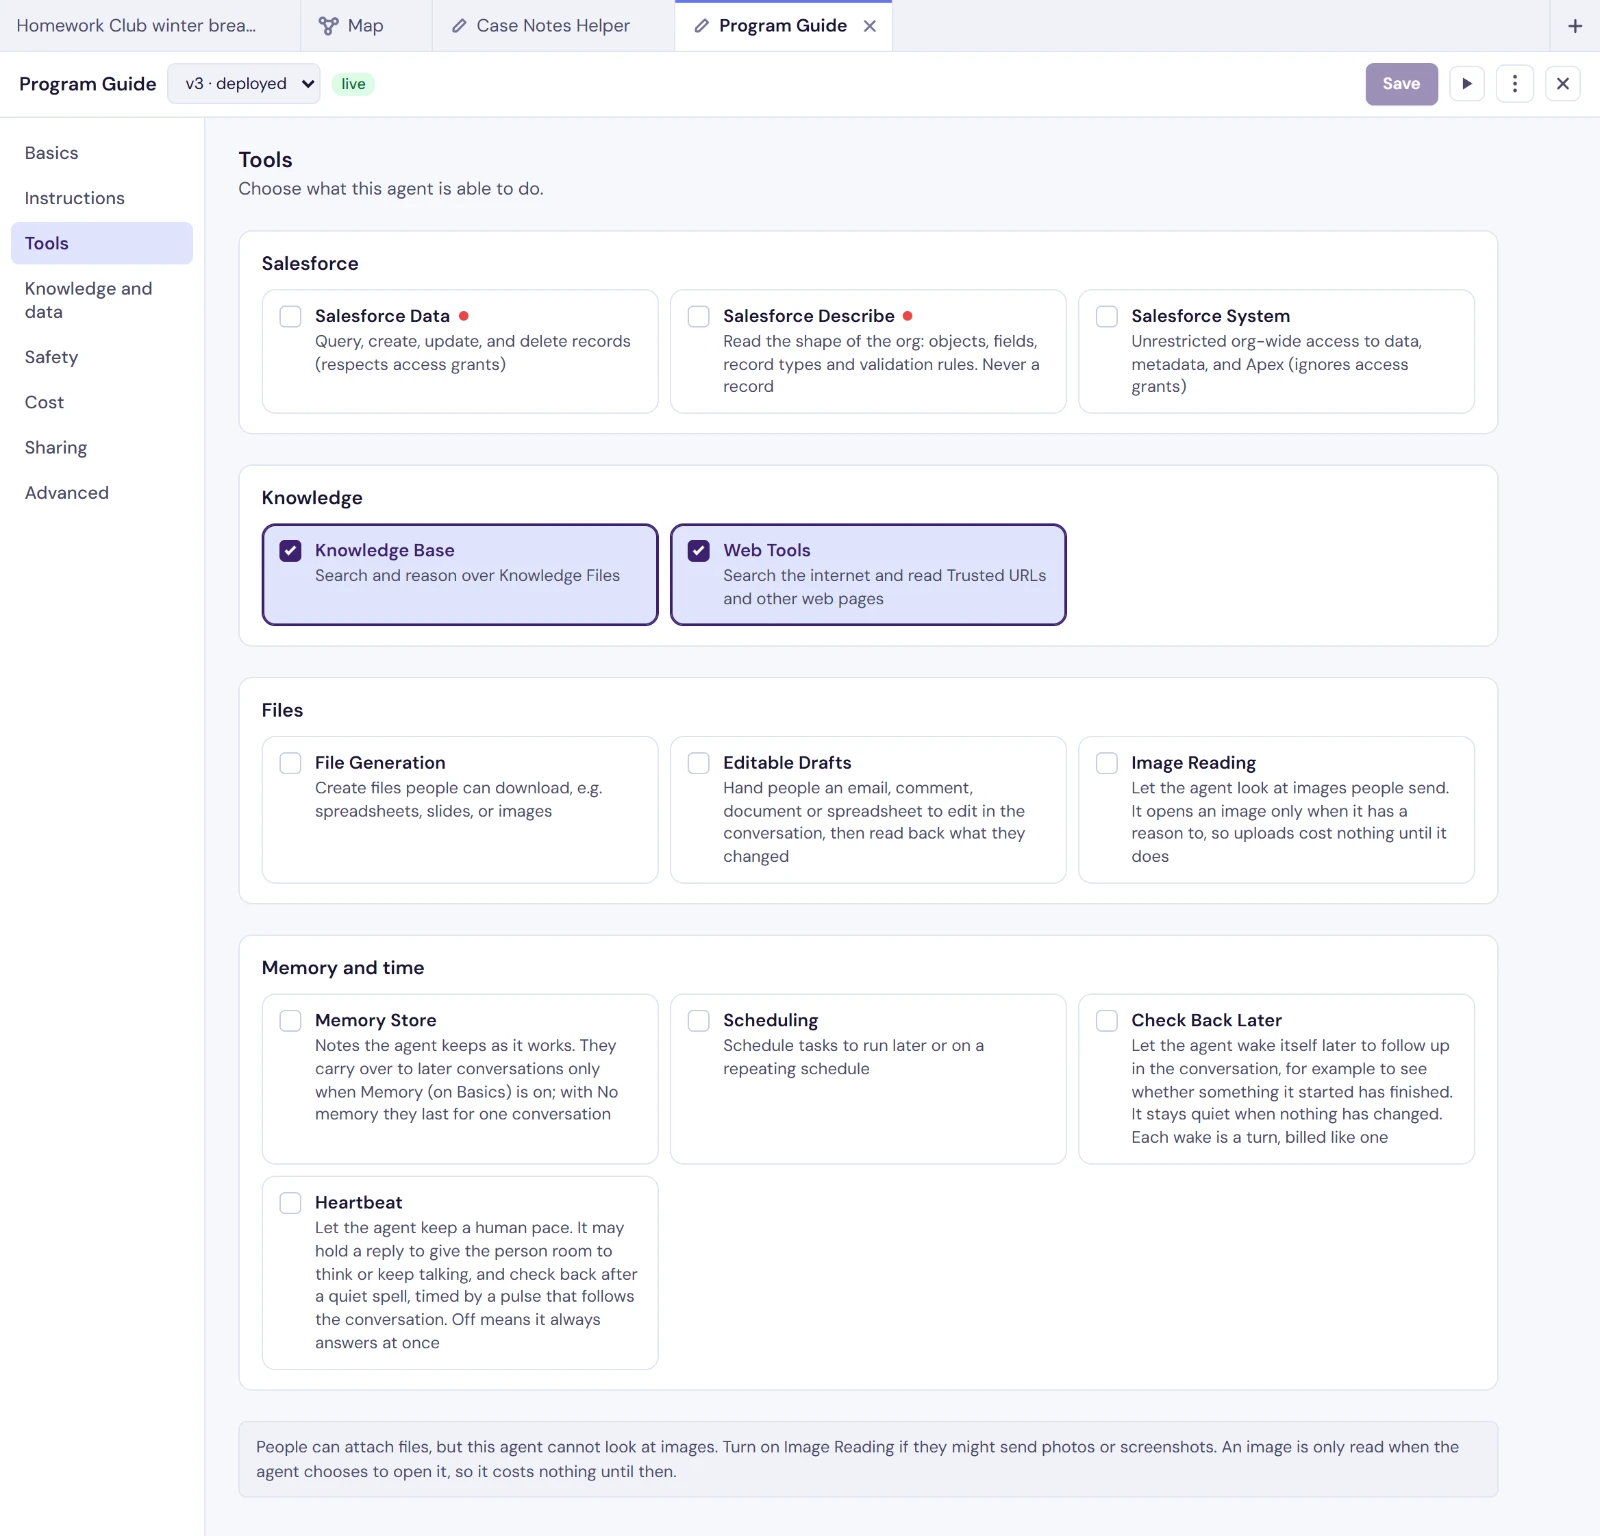
Available Tools
| Group | Tool | Description |
|---|---|---|
| Salesforce | Salesforce Data | Look up and work with your Salesforce records: find, create, update, and delete data. Stays within the limits you set in Access Grants. |
| Salesforce | Salesforce Describe | Read the shape of the org: objects, fields, record types and validation rules. Never a record. |
| Salesforce | Salesforce System | Full, unrestricted access to your entire Salesforce org. Ignores Access Grants, so only turn this on for agents you completely trust. |
| Knowledge | Knowledge Base | Search and answer questions from the knowledge files you've uploaded. |
| Knowledge | Web Tools | Search the internet, and read Trusted URLs and other web pages. |
| Files | File Generation | Create files people can download (spreadsheets, images, slide decks, and more). |
| Files | Editable Drafts | Hand people an email, comment, document or spreadsheet to edit in the conversation, then read back what they changed. See Drafts. |
| Files | Image Reading | Let the agent look at images people send. It opens an image only when it has a reason to, so uploads cost nothing until it does. |
| Memory and time | Memory Store | Notes the agent keeps as it works. They carry over to later conversations only when Memory is on; with No memory they last for one conversation. |
| Memory and time | Scheduling | Run a script later or on a repeat, with nobody watching. Results wait until someone next talks to the agent. |
| Memory and time | Check Back Later | Let the agent wake itself later to follow up in the conversation, for example to see whether something it started has finished. It stays quiet when nothing has changed. Each wake is a turn, billed like one. |
| Memory and time | Heartbeat | Let the agent keep a human pace: it may hold a reply to give the person room to think or keep talking, and check back after a quiet spell. |
Note: Salesforce Data and Salesforce System do their work through the Code tool, so turning either on turns on Code too.
Scheduling spends against your organization's monthly limit with nobody watching. A repeating schedule has to end, after a number of runs or on a date at most a year out, runs no more often than every 5 minutes, and an agent can have at most 25 active schedules. A scheduled script cannot reach Salesforce on its own: it needs AI-Enabled Code so it can ask the agent to do that work.
Choosing between Salesforce Data and Salesforce System: Use Salesforce Data for almost everything. It can read and change records, and it respects the per-object limits you set in Access Grants. Choose Salesforce System only when an agent genuinely needs to reach the whole org, for example an admin assistant that manages setup. Because it ignores Access Grants, turning it on asks you to confirm first. While Salesforce System is on, Salesforce Data is marked as superseded, since it adds nothing.
Heartbeat adds a Resting pace field, from 0 (slow and spacious) to 1 (brisk), where the pace settles when nothing is happening. Blank means 0.5. It applies in Greenhouse and to people signed in to the chat; everyone else gets an answer at once.
If people can attach files but Image Reading is off, the section reminds you: the agent cannot look at a photo or a screenshot without it.
Tools on the Advanced section
More tools live on Advanced rather than here. Some are turned on for you by the thing that needs them: add a knowledge file, a Trusted URL or an advisor and the tool that reads it comes on. You can still set them yourself.
| Group | Tool | Description |
|---|---|---|
| Runtime | Code | Generate and run code as needed. Turned on automatically by the capabilities that need it. |
| Runtime | AI-Enabled Code | Allow code to run AI. Requires Code. |
| Runtime | Consult Agent | Delegate to a specialist agent. Turned on automatically when you add an advisor. |
| Runtime | Ask for Secrets | Let the agent ask the person it is talking to for an API key or password in a secure box, saved to its own secrets without passing through the chat. |
| Runtime | Web App Authoring | Publish web apps and their handlers onto agents this agent administers. A builder's capability. |
| Desktop | Desktop Control | Let the agent work on a Windows computer running the Flourish operator app. Off on new agents, and nothing turns it on for you. |
| Desktop | Own Desktop | When no computer is connected, the agent starts a fresh cloud desktop for the conversation, with Chrome and a shell and nothing signed in. Turning it on turns on Desktop Control. |
Note: Turning on AI-Enabled Code turns on Code as well. Turning off Code turns off AI-Enabled Code.
Desktop Control
This one is different from everything else in the grid, and it is worth reading before you switch it on.
It reaches a real computer. Every other tool works on your data, your documents or the web. This one works a real computer at a real desk, and what it can reach there is whatever the person sitting at that desk can reach.
You are not the one who decides what it may do. Turning it on does not give the agent a computer. Someone at the machine has to start a session, and the machine itself holds the list of what is allowed: which applications, which folders, whether the agent may drive at all. That list is set on the computer, and the agent can neither read nor change it. If nobody has started a session, the agent says so rather than doing anything.
It needs a model key. Desktop Control only works on agents running on an Anthropic model key. Add a secret named _BYOM_KEY_ANTHROPIC or _BYOM_KEY_INTERNAL under Secrets first. Without one the agent refuses every attempt and explains why in the chat. The builder shows a reminder on Advanced whenever Desktop Control is on.
Setting up the computer is a separate job. The machine needs the operator app installed and enrolled against your org. That is not done from the builder; ask whoever set up your Flourish account. With Own Desktop on, the agent can start a cloud desktop of its own instead, and when it reaches a sign-in, a code or a captcha there, it asks you to open the screen and do that part yourself.
A note on prompt injection. An agent reads a lot of text it did not write: web pages, documents, messages from the people it talks to. With Desktop Control on, instructions hidden in any of that reach a real computer for the first time. The machine's own rules are what stops them, which is why those rules live on the machine and not here. Give this to agents whose sources you trust.
Safety
Safety screening checks what people send in before the agent sees it, and what the agent sends back before it goes out. The two are set separately, under What people send in and What the agent sends back.
| Screening | Description |
|---|---|
| None | No safety check applied. |
| Prompt | A Safety prompt you write says how to judge a message, and what to do when it fails. The agent blocks messages that fail. |
| Agent | Another agent on the platform, named by its Safety agent id, returns a verdict. |
Once a screening has been set, switching back to None stops sending it but does not clear the one stored. Start a new version for a clean slate.
Knowledge and data
The trusted resources in this section are attached to a specific version and define what data and systems the agent can access during a conversation. Removing one asks you to confirm first.
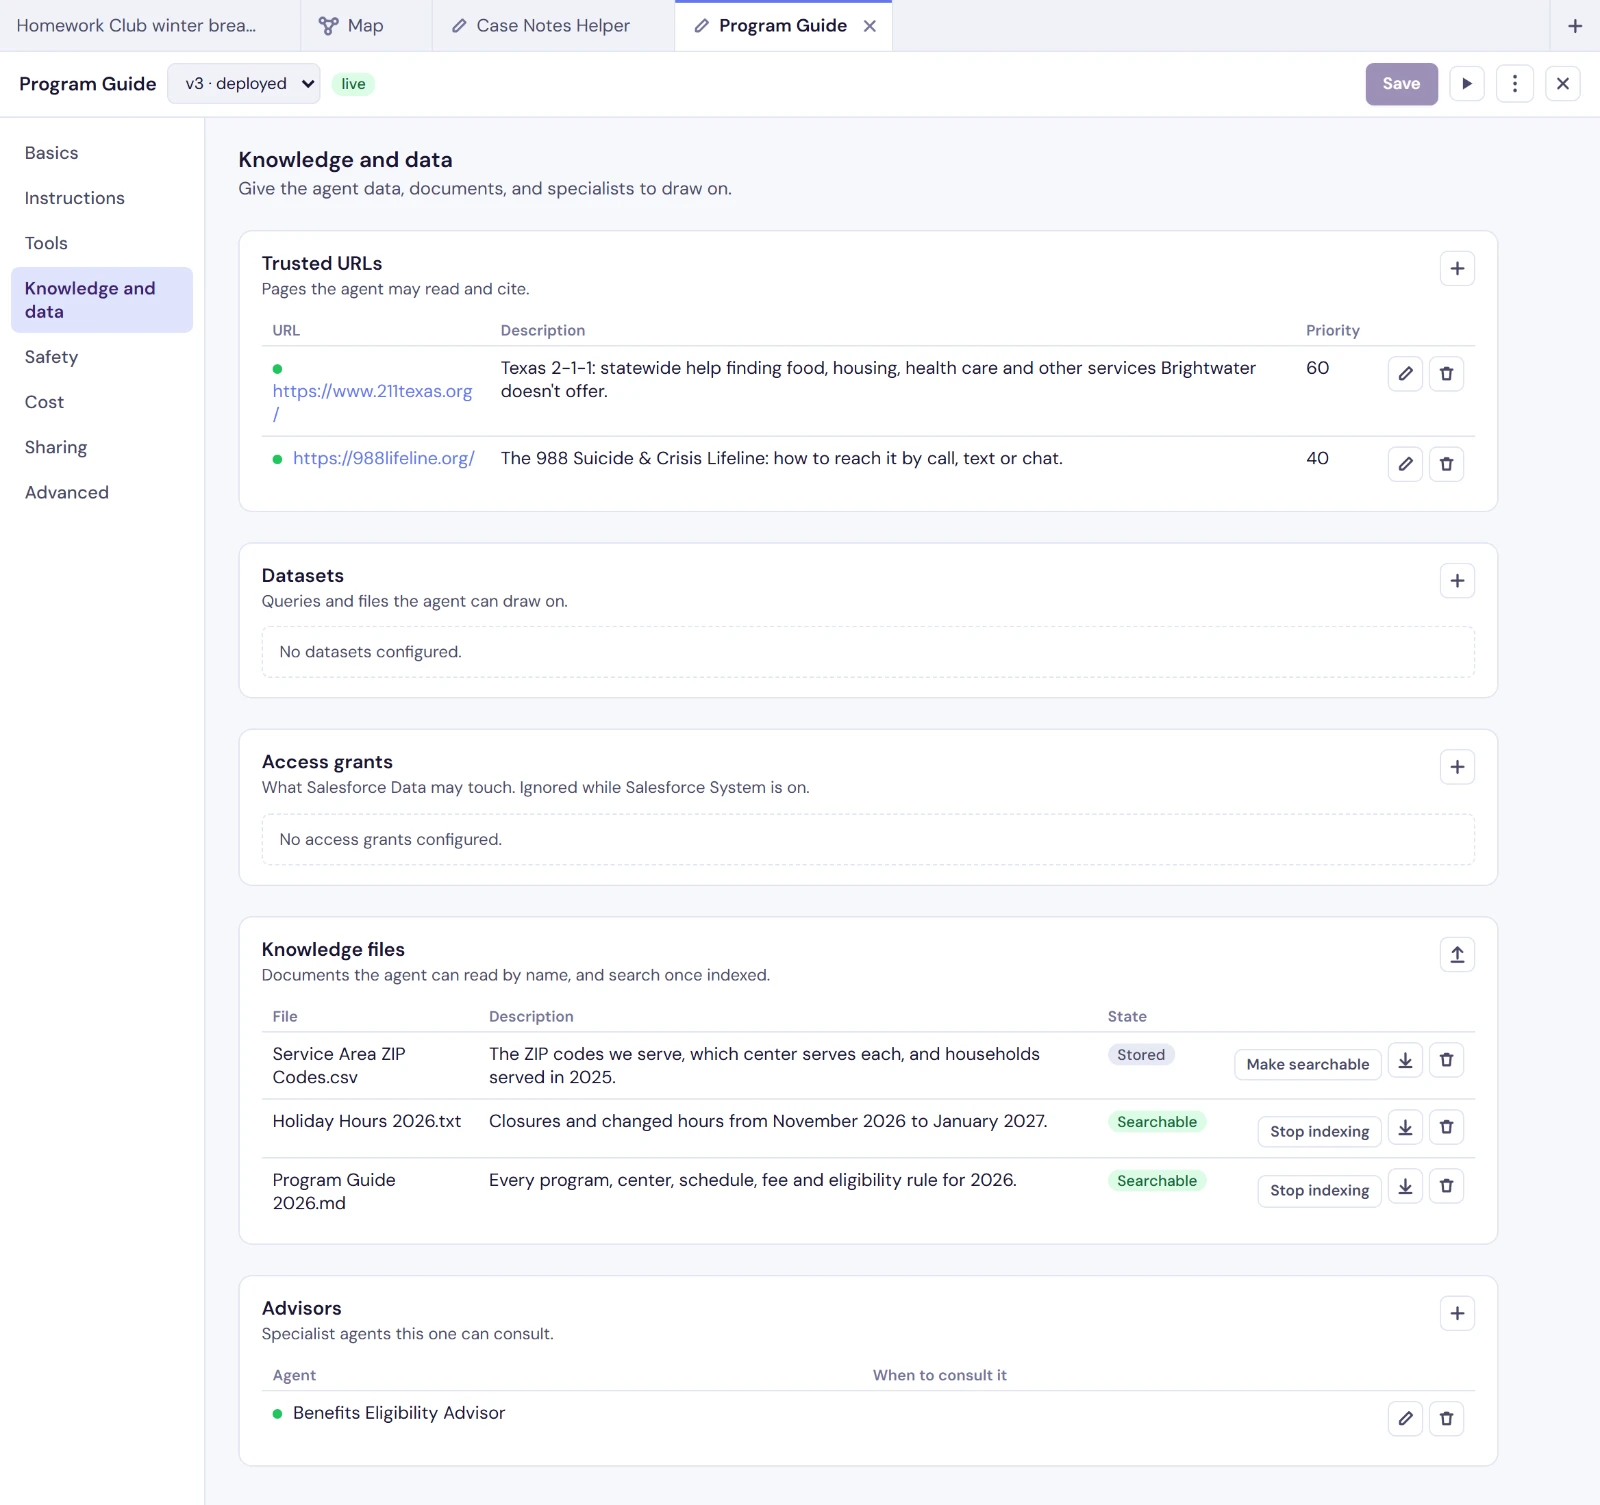
Trusted URLs
Web pages you want the agent to be able to read. Add the address, describe what is on the page, and the agent can draw on it. Adding one turns on Web Tools.
| Field | Description |
|---|---|
| URL | The full web address, starting with https://. Plain http:// is refused: the agent reads whatever comes back and acts on it, so the connection has to be one nobody can tamper with in transit. |
| Description | Plain-language description of what the page contains. This is shown directly to the agent. |
| Priority | 1-100. Higher priority sources are given precedence when several could answer. |
| Enabled | Turn the URL on or off without deleting it. |
Datasets
Datasets provide the agent with data to reason over. Each dataset has a platform, a source, and a description that tells the agent what the data contains. For web addresses, use Trusted URLs above.
| Field | Description |
|---|---|
| Platform | The data source (Salesforce, Box, Cloudflare, Google Maps). Web addresses go under Trusted URLs instead. |
| Environment | Pin this resource to a specific environment. Leave blank to inherit the session environment. |
| Source | A SOQL query or file path, depending on the platform. |
| Description | Plain-language description of the data. This is shown directly to the agent. |
| Priority | 1-100. Higher priority datasets are given precedence when multiple sources are available. |
| Enabled | Turn the dataset on or off without deleting it. |
Example: Salesforce dataset
| Field | Value |
|---|---|
| Platform | Salesforce |
| Source | SELECT Id, Name, Title, Email FROM Contact WHERE AccountId = [the Account's Id] |
| Description | Contacts at the Account the user is viewing. The Account's Id is sfdc_record_id in the host context. |
| Priority | 80 |
The agent reads a source as a description of what to fetch and writes the query itself, so a value from the page is named in words, as here. Nothing substitutes it into the source.
Access Grants
Access grants control what the agent is permitted to do on a given platform. An agent with the Salesforce Data tool enabled still needs an access grant to determine which objects it can look up, create, update, or delete.
Note: Access grants apply to the Salesforce Data tool. They do not limit Salesforce System, which always has full access to the entire org. If an agent has both Salesforce System and access grants turned on, the builder reminds you that the grants no longer apply.
| Field | Description |
|---|---|
| Platform | The platform to grant access on: Salesforce, Box or Cloudflare. |
| Environment | Pin to a specific environment, or leave blank for the session default. |
| Scope | The objects or resources in scope, e.g. Contact, Account or * for all. |
| Permissions | A combination of read, create, update, and delete. |
| Enabled | Turn the grant on or off without deleting it. |
Knowledge Files
Knowledge files are uploaded documents the agent can read: PDF, Word, plain text, Markdown, HTML, CSV, code, and common image types, up to 50 MB each.
Uploading a file and making it searchable are two different things. Building a searchable index costs a model call per section of the file and, for a spreadsheet, buys nothing a search could use. So Upload a file asks whether to Make it searchable now, and leaves it off unless you tick it. A file left unindexed is in a normal, finished state, not a failure.
| Status | Meaning |
|---|---|
| Stored | The file is uploaded and usable. The agent's Code tool can read it by filename, but a search will not find it. Normal for spreadsheets, data files and images. |
| Indexing… | A searchable index is being built. |
| Searchable | The agent can find this file by searching. |
| Not searchable | Indexing finished but produced nothing to search. Rebuild it. |
| Error | The index build failed. Hover the status for the reason. |
Each row offers the one thing its status allows: Make searchable on a stored file, Stop indexing on a searchable one, Retry indexing on a failed build, and Rebuild index on one that produced nothing. Any file can be downloaded again.
If a file will only ever be read by the Code tool, which is how a large spreadsheet should be used, leave it Stored. Indexing it does not help. Uploading a file turns on Knowledge Base, which searching needs.
Removing a file removes it from this version, not from the agent. Another version still using it keeps working, and the file is erased once no version references it. That is what makes versions usable as experiments.
Advisors
Advisors allow your agent to consult other agents as specialists during a conversation. This is useful for routing complex questions to domain experts without building a single monolithic agent.
| Field | Description |
|---|---|
| Agent | The advisor agent to consult. Pick one of your agents, or choose Another agent, by id and paste its Agent ID. |
| When to consult it | Shown to this agent so it knows when to consult the specialist. Write it in the third person, e.g. "Consult this agent when the user asks about benefits eligibility." |
| Additional instructions | Optional. Extra instructions prepended to the advisor's own prompt when consulted. Write in second person addressing the specialist, e.g. "Only answer from your uploaded documents." |
| Enabled | Turn the advisor on or off without removing it. |
Adding an advisor turns on Consult Agent, which advisors need.
Either way, the other side has to agree. Listing an agent here says you want to consult it. It does not give you permission. The agent being consulted must also share itself with this one at Consult Only, in its own Sharing (see Sharing with an agent). Set up only this half and the consultation is refused while the conversation is running, with nothing on this screen to explain why. That matters most for an agent someone else manages, since you cannot set the other half yourself.
Cost
Cost bounds what this one agent may spend on AI in a calendar month.
Monthly limit (USD) takes a whole number up to 5,000.
| What you enter | What it means |
|---|---|
| Blank | No limit of its own. The agent is bounded only by your organization's monthly cap. |
0 | This agent spends nothing at all. A deliberate off switch, not the same as blank. |
| A number | This agent stops at that amount for the month. |
Blank is the one worth thinking about. An agent with no limit of its own can spend your organization's whole monthly cap, and reaching that stops every other agent, chatbot and scheduled task in the org until the 1st. One agent nobody bounded can take everything else down with it.
So set a limit before you publish anything the public can reach: a chat window on your website, a public link, or a web app on a public page. Opening an agent to the public asks for one if it has none. An agent only your team can reach is less exposed, but a runaway loop costs the same either way.
The limit counts what Flourish pays for, so it does not hold an agent that runs on a Flourish seat or on your own AI provider key.
A per-agent limit can only tighten what the organization's cap already allows. It cannot raise it.
Limits reset at the start of each month, UTC.
Sharing
Sharing lists everyone with access to this agent under Who has access. Share with someone (+) grants access, and the trash button on a row revokes it.
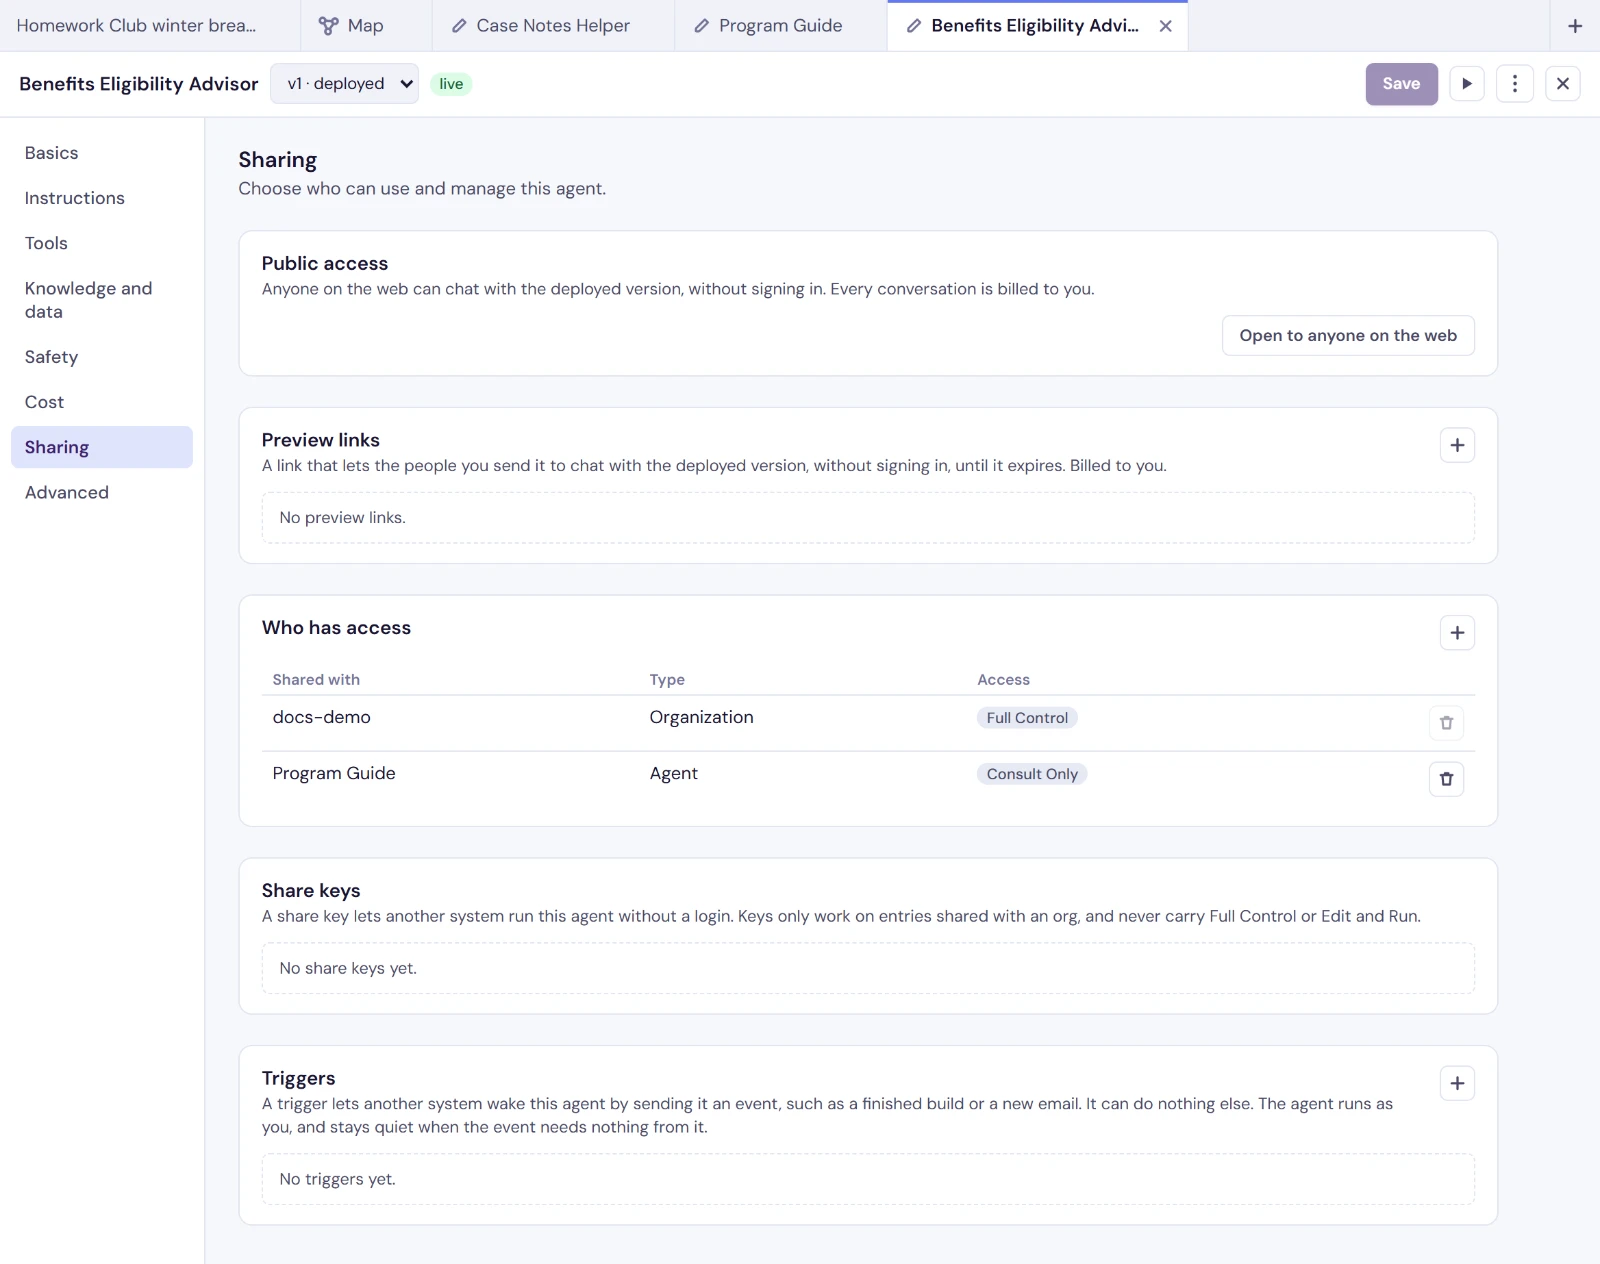
Here the Benefits Eligibility Advisor is shared with the Program Guide at Consult Only, the half that goes with the Program Guide listing it under its Advisors.
Everyone in your own organization can already use every agent your organization owns. You do not need to share an agent with your own colleagues. Sharing is for reaching outside your organization, or for an agent that belongs to you rather than to your organization.
A grant pairs a grantee, With, and a role, Access:
| With | Meaning |
|---|---|
| User | One named person. |
| Org | Everyone in another organization. |
| Agent | Lets that agent consult this one. |
| Everyone on Flourish | Everyone signed in to the Agent Platform. |
| Access | Meaning |
|---|---|
| Full Control | Everything, including sharing and deletion. |
| Edit and Run | Can change the agent's configuration and use it. |
| Run Only | Can chat with the agent. |
| View Only | Can see the agent but not change or use it. |
| Consult Only | Can be consulted by another agent. An agent grantee always gets this, and only this. |
Roles are named for what they allow rather than for who holds them, because the two are independent: an Org grantee can be Run Only, and a User grantee can have Full Control.
Flourish User and Flourish Org name the grantee. For a User, the org starts as your own; clear it to share with someone who belongs to no organization, who is matched by the name they sign in with. If you are naming a person in another organization, fill in both their user and their org: a user on their own is read as somebody with no organization, so a grant made that way looks correct in the list and never lets them in.
Entries are not edited in place. To change one, add the new entry, then revoke the old one.
You cannot revoke the last Full Control entry, or the entry naming the agent's owner. That is the Full Control row written when the agent was created. Ownership is recorded on the agent itself, so removing the row would take nobody's access away, and the platform refuses it instead.
Sharing with an agent
Choose Agent and pick one of your agents, or choose Another agent, by id and paste its Agent ID. The agent can consult this one, and nothing more.
This is one half of a pair. Granting an agent access here lets it consult this one. The other agent still has to list this one under its own Knowledge and data, Advisors. Do only this half and nothing happens.
Public access and preview links
Public access opens the deployed version to anyone on the web, without signing in, through a link or a chat window on your website. Preview links let the people you send one to chat with the deployed version until it expires. Both are billed to the agent's owner. See Chat on your website.
Taking ownership
If you have Full Control of an agent you do not own, a crown button on your own entry takes ownership. Greenhouse shows what moves and what changes before you confirm, and an agent that works with its owner's Salesforce data asks you to acknowledge that its Salesforce tools will change. The old owner keeps Full Control.
Triggers
A trigger lets another system wake this agent by sending it an event, such as a finished build or a new email. It can do nothing else. The agent runs as you, and stays quiet when the event needs nothing from it.
Create a trigger asks for:
| Field | Description |
|---|---|
| Name | Where events come from, such as github. The agent is told this. Letters, digits, dots and dashes. |
| Description | Optional. |
| Where it runs | A new conversation each time, The conversation the person used last, or One conversation. |
| Apps that count | For the conversation used last: which apps count, separated by commas. greenhouse is Greenhouse. |
| Conversation id | For one conversation: its id. |
| Most events an hour | A ceiling on how often it can wake the agent. |
| Signing secret | Only if the sender signs what it sends, as GitHub does: the same secret you give it, at least 16 characters. Otherwise leave it blank and use the key. |
Greenhouse then shows the address to send events to and a key, sent as the fl-trigger-key header. The key is shown once, so copy it then, and keep it on the sending system, never in a web page. Revoke stops a trigger; events already queued and not yet run are dropped.
Share Keys
A share key lets another system run this agent without signing in: a partner's website, an internal service, anything with a server of its own. The key says which agent may run and at what level; everything else about the conversation still belongs to whoever presents it.
Create one with the key button on a row under Who has access. The key inherits that row's access, so the row decides what the key can do.
Not every row can have one
The key button appears only on rows that can back a key, and two rules decide it.
The row has to be shared with an Org. A key acts as the organization it was shared with, so a row naming one person, one agent, or everyone has no organization for it to act as.
The role has to carry no administrative power. A key is something you hand to somebody else, so it cannot be one that could edit the agent, read its secrets or mint more keys: that is not a narrower credential than your own, it is a broader one with a smaller name. Today that means Run Only and View Only can back a key and Full Control and Edit and Run cannot.
The key is shown once
Create a share key asks for a Label, an optional Description, and Expires on, a date at the end of which the key stops working. Leave it blank for a key that does not expire.
When you create the key, the secret appears in the dialog. That is the only time it exists anywhere you can read it. It is not stored in a recoverable form and cannot be shown again. Copy it before you close the dialog. If you lose it, revoke the key and create another; nothing else is affected.
Never put a key in a web page. It belongs on a server. Whatever holds it uses it to start a conversation and passes the page only the short-lived token it gets back. A key in page source is a long-lived credential any visitor can take.
Managing keys
Share keys lists each key with its label, the entry it came from, when it was last used, and when it expires.
| Status | Meaning |
|---|---|
| Active | Working now. |
| Expired | Past its expiry date. Kept in the list for the record. |
| Revoked | Turned off deliberately. Kept in the list for the record. |
Revoking a key is not unsharing. Revoking a key stops that key working immediately and changes nothing else: the sharing entry stays, and any other key on it keeps working. Revoking the sharing entry instead removes the access altogether, and its keys along with it.
Advanced
Advanced holds the runtime tools and the settings for developers building integrations.
Custom Actions
Custom Actions define structured commands your agent can send to the page hosting it during conversations. The agent asks; the host page acts. Each action becomes a tool the agent can call, and the host receives typed events it can handle programmatically.
| Field | Description |
|---|---|
| Action type | A lowercase identifier (letters, digits, underscores). For example: search, navigate, filter_by_type. |
| Description | Required. Tells the agent when to use this action. This text is shown to the model in its tool catalog. |
| Properties | Optional parameter definitions. Each property has a Name, Type (string, integer, number, boolean, or array), Description, and a Required checkbox. |
| Enabled | Turn the action on or off without deleting it. |
Receiving an action is developer work: the chat window delivers it to the host page as a postMessage. See Receiving Agent Actions in the iframe. Inside Salesforce, the Chatbot component also raises it as an event; see Handling Agent Actions.
Secrets
Secrets are environment variables the agent's scripts read at runtime. Values are encrypted before they are stored and never shown again.
| Field | Description |
|---|---|
| Environment variable | The variable name, using uppercase letters, digits and underscores (e.g. SFDC_ACCESS_TOKEN). |
| Value | Write-only. Editing a secret asks for a New value; leave it blank to keep the current one. |
| Description | What this secret is for. |
| Enabled | Turn the secret on or off without deleting it. |
Secrets belong to the version. Names beginning with FLOURISH_ are reserved for the platform's own script variables and are refused. DATABASE_URL is not reserved, so it is free for a database of your own.
Integrations
An integration is an account the agent acts in, as whoever connected it, for everyone who uses the agent: a Salesforce org, or another service the Agent Platform supports. An integration belongs to the agent rather than to a version, so connecting one needs no new version and a rollback does not undo it.
Add an account offers the accounts already connected on the Flourish Dashboard first, yours and your organization's (see Connections). The agent uses the one you choose as it is, kept and refreshed by Flourish. Choose Another account: sign in here for one nobody has connected there.
| Field | Description |
|---|---|
| Account or Provider | The account to use, or the service to sign in to. |
| Env prefix | Decides the environment variable names the agent's scripts see: a prefix of SFDC gives SFDC_ACCESS_TOKEN and SFDC_INSTANCE_URL. |
| Label | Optional. Your name for the connection, such as Production CRM, so a list of several is readable. |
Signing in here opens the provider in a new window to sign in and approve. A connection that has lapsed offers Reconnect, and the trash button disconnects it. One connected on the Flourish Dashboard is reconnected there.
Using your own OAuth app is optional. Leave Client id and Client secret blank and the connection uses the Flourish-managed app, which is the normal path. To use your own, create an External Client App in your Salesforce org with the callback URL the form shows, then paste its credentials in. A connection using your own app is marked own app.
With your own credentials, Login URL (My Domain) is required. It is the My Domain address of the org where your External Client App is defined, such as
https://yourorg.my.salesforce.com, with nothing after it. Consent and the token exchange happen there, not atlogin.salesforce.com.
Python Packages
If the agent's Code tool needs specific Python packages, list them here, one per line. They are installed before the agent's code runs.
Example:
scipy
matplotlib
pandas
Import and export
- Export configuration, in More, copies the current version's configuration as JSON to your clipboard.
- Import configuration takes pasted JSON and applies it to the form. Its datasets, access grants, advisors and actions are added straight away; the rest waits for Save. The agent's name and Agent ID are never overwritten by an import.
Delete agent, in More, removes the agent from everyone's lists and closes every conversation with it.
Typical Setup Flow
- In New chat, click New agent, fill in the name and description, choose the Memory setting (it locks once the agent stores anything), and pick an Approach.
- Click Create agent. The Agent Platform assigns a permanent ID, and v1 starts as a draft.
- On Instructions, write the Profile and Startup instructions.
- On Tools, turn on what the agent needs, and on Basics, Let people attach files if they should be able to.
- On Safety, configure the screening.
- On Knowledge and data, add trusted URLs, datasets, access grants, knowledge files, and advisors.
- Optionally, on Advanced, configure custom actions, secrets, integrations, and Python packages.
- On Cost, set a monthly limit.
- Click Save, then Deploy. The agent is now live.
- Click Test to try it, and start a new version for each change after that.
- On Sharing, grant access to the people, organizations, or agents that need it, or open it to the public to put it on your website.